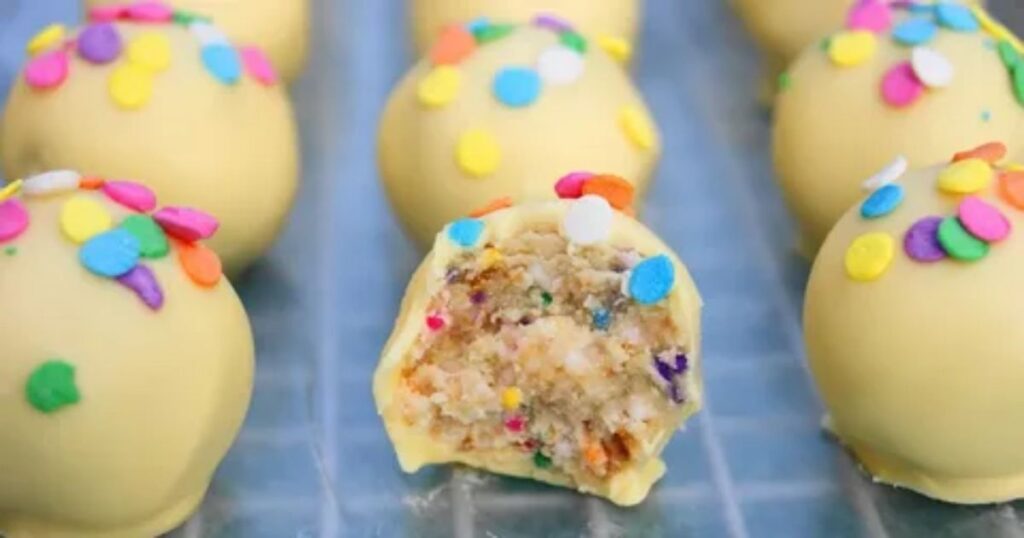
Golf ball cake pops are delicious treats shaped like miniature golf balls. To make them, you’ll need to bake a cake, crumble it, and mix it with frosting. Then, roll the mixture into small balls, dip them in white candy coating, and decorate with dimples to resemble golf balls. These sweet treats are perfect for golf-themed parties and events.
Are you ready to ace your dessert game? Learn how to make golf ball cake pops, the perfect sweet treat for golf enthusiasts and parties. Crafting these delightful golf ball cake pops is a hole-in-one idea that will score big with your guests. Follow along to discover the step-by-step process of creating these adorable, edible golf balls that will take your baking skills to the next level.
Stay with us as we delve into the delightful world of making golf ball cake pops. We’ll walk you through the simple process of baking, shaping, and decorating these sweet golf-themed treats. Whether you’re a novice baker or an experienced one, our step-by-step guide will ensure your success. So, let’s get started and make your own scrumptious golf ball cake pops!
Getting Started
Gathering Ingredients and Supplies
To embark on your golf ball cake pop journey, the first step is gathering all the necessary ingredients and supplies, including “golf balls in a box.” You’ll need a baked cake of your choice (typically a simple, unfrosted one), a batch of frosting, and candy melts or coating in white or any preferred color.
Additionally, ensure you have a mixing bowl, cake pop sticks, and a styrofoam block for holding the pops while they set. Collect everything in one place, creating an organized and convenient workspace to streamline the process.
Preparing the Cake
Once you have your ingredients and supplies ready, it’s time to prepare the cake for transformation into delectable cake pops. Start by allowing the cake to cool completely, ensuring it’s no longer warm to the touch. Next, crumble the cake into fine pieces using your hands or a food processor.
The finely crumbled cake will become the base for your cake pops, providing the perfect texture for mixing with frosting and shaping into those delightful golf ball forms.
Shaping the Golf Balls
In the next phase of creating golf ball cake pops, we’ll delve into shaping the cake mixture into those delightful round golf ball forms. This step is crucial for achieving the perfect look and taste of your cake pops.
Mixing with Frosting
Before we can shape our cake balls, it’s essential to mix the crumbled cake with frosting. This process adds moisture and flavour to your cake pops, making them irresistibly delicious. Use your favourite frosting – it can be as simple as vanilla or something more exotic.
The frosting should be added gradually until the cake mixture reaches a consistency that allows it to stick together without being too wet or too dry. Proper mixing ensures your cake pops have the ideal texture for shaping and decorating.
Rolling the Cake Balls
With the cake and frosting thoroughly mixed, it’s time to shape them into small golf ball-sized spheres. Scoop out a small amount of the mixture and roll it between your palms to form a smooth and even ball. Make sure the size is consistent, and don’t forget to work quickly to prevent the mixture from drying out. These cake balls will serve as the foundation for your golf ball cake pops, ready to be dipped and decorated in the following steps.
Dipping and Coating:
When you’ve successfully shaped your cake balls into adorable, bite-sized golf ball forms, it’s time to move on to the next exciting phase: the dipping and coating process.
Melting Candy Coating:
The first step in this stage is to melt your candy coating. This coating is what will give your cake pops that smooth, enticing exterior. To melt the candy coating, place it in a microwave-safe bowl and heat it in short intervals, stirring in between to ensure it melts evenly.
Be cautious not to overheat it; the ideal consistency is smooth and easily coatable. Once the coating has achieved the right texture, you’re ready to proceed to the next step.
Dipping the Cake Pops:
Now comes the fun part – dipping your cake balls into the melted candy coating. Take each cake pop stick and dip it about half an inch into the coating before inserting it into a cake ball. This step helps secure the cake ball to the stick. Afterward, carefully dip the entire cake ball into the melted coating, making sure it’s fully covered.
Allow any excess coating to drip off, then gently insert the cake pop into a styrofoam block to dry. It’s essential to let the coating harden completely before moving on to the next stage of decorating your golf ball cake pops.
Rolling the Cake Balls
In this essential step of creating golf ball cake pops, you’ll transform your cake and frosting mixture into perfectly round, bite-sized spheres. With your hands, take a portion of the moist cake and frosting blend and roll it into small, uniform balls. These cake balls should be roughly the size of a golf ball, making them the ideal canvas for your golf-themed confections. Take your time to ensure that the cake balls are smooth and free from any cracks or imperfections. A well-rolled cake ball provides the foundation for the next stage of decorating and dipping.
Decorating Like Golf Balls
Once you’ve achieved the desired round shape for your cake balls, it’s time to turn them into mini golf balls that are visually convincing. Start by coating each cake ball with white or colored candy melts, creating a smooth surface that resembles the outer layer of a golf ball. This coating will serve as the base for your golf ball design.
Creating Dimples
To make your cake pops truly resemble golf balls, you’ll need to add the iconic dimples. Using edible markers or food-safe paint, carefully draw or paint dimples on the candy-coated cake balls. These dimples mimic the texture of a golf ball, giving your cake pops an authentic appearance.
Final Touches
After creating the dimples, consider adding any final decorative touches. You can place a small edible golf tee on top of the cake pop or stand them on a green-colored base, reminiscent of a golf course. These finishing touches enhance the overall presentation of your golf ball cake pops, making them ready to be displayed and enjoyed.
FAQS
How long do golf ball cake pops stay fresh?
Golf ball cake pops are best when consumed within 2-3 days for the freshest taste.
Can I use store-bought cake for this recipe?
Yes, store-bought cake can be used as a convenient alternative for making cake pops.
Are there any gluten-free options for this recipe?
Yes, you can use gluten-free cake and frosting for a gluten-free version.
How do I store leftover cake pops to keep them fresh?
Store cake pops in an airtight container at room temperature or in the fridge for up to a week.
Conclusion
Mastering the art of making golf ball cake pops is a creative and rewarding endeavour. By following our step-by-step guide on how to make golf ball cake pops, you can bring a touch of the golf course to your dessert table. These sweet, golf-themed treats are not only delicious but also a delightful addition to any special occasion.
So, roll up your sleeves, get your hands on some cake and frosting, and craft your very own golf ball cake pops to impress your guests with your newfound baking skills. Enjoy the process and the scrumptious results of your cake pop-making journey!